Thursday, December 22, 2016

Light and Shadow

EU: Learning to see light and use it in your photographs is an important skill that will make your photographs stronger 

EQ: How can you use light and shadow to create a stronger image?

New Camera Function: I want you to work in Aperture mode for this assignment. When shooting an object this will help to get either a clear or softly blurred background. 

A Simple Exercise to help you learn to See Light


Watch this Video: Click Here

Homework for the week: Take 5 photographs of an egg to edit and post on your blog this week. (For our purposes, you may move the egg around or shoot at different times of day)

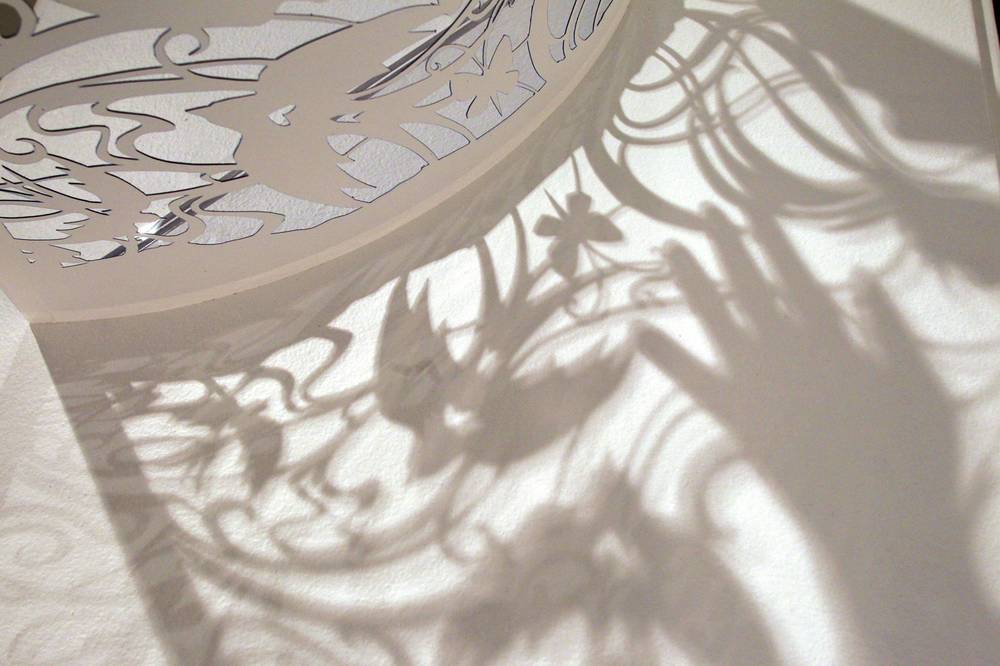
In class assignment: Cut Paper with Light and Shadow

Objective: to create a subject using cut paper to capture light and shadow in photography

Timeline: 5 classes (3 to brainstorm and build, 1 to shoot, 1 to edit and blog)

Steps:
  • Use the sample images below to help you start thinking creatively. We can use the light tents to shoot for this project which will simulate better lighting conditions using diffused light for your subject matter. (Hint: the designs below are somewhat elaborate because I would like you to push yours to be elaborate as well)
  • Brainstorm and think about how you would like to use cut paper to shoot your images
  • You will have to draw for this assignment, this may be challenging for many of you so it may be good to develop a pattern versus an image. 
  • Start cutting using only white paper, Exacto knives and scissors being careful not to rip or tear your paper (tip: if you get it dirty in areas you can Photoshop it out but try your best to keep it clean)
  • If you have a very creative idea beyond the white paper and cutting you may ask me if it is okay to pursue it (creativity is good but I want your main goal to really be focusing on the light and shadow in the final images)
  • Shoot your finished piece using light to your advantage (use phones as flashlights, diffused spotlights, windows, etc for light sources)
  • Print a contact sheet of 30 images. 
  • Edit and post your 1 or 2 of your strongest images with a reflection


Thursday, December 15, 2016

Double Exposure: Silhouette Tutorials

12/15 

Please watch the tutorials below and begin your project or practice with internet images (if you do not yet have your images). They are due next week so you should have them at this point.

Although there are many different styles of double exposure these will help you get the sense of what I have been going over in class. Some of the wording in the videos are different but you know all of the tools. Selections can be made in many ways but you guys should try to use the "Select and Mask" tool that you are used to. You can watch and bring up Photoshop and press pause while practicing each step. 

*There are also many more tutorials on Youtube to view so take advantage!!!

Double Exposure Effect Photoshop Tutorial


Easy Double Exposure #Photoshop Tutorial

(This one is harder, but it has the empty top of the head which you may want, also the narrator uses adjustment layers on his layers palette but you can use them by going to image->adjustments like you are used to) I am talking about Black and White, etc.....)


Monday, November 28, 2016

11/28 In Class Assignment: B and G Block

Assignment: G and B Block 
This is to be done in class. I am going to check it off in PowerSchool today. If you do not do it it is a zero. No Makeups. 

I am out on a professional development day. You are to look at the two new assignments below and write a blog post discussing your ideas for each assignment. Attach images that you have found that inspire you to the post. Both will be done within the next few weeks before the holiday break.

*You are doing this blog post in order to get ideas that are different than your classmates. I want to see some creative thinking (part of your grade!)


Assignment 1: Double Exposure

EQ: How can you successfully blend two images in Photoshop?

This is a Photoshop project....You will show two examples of double exposure.

  1. One that blends two photographs, one over the other 
  2. One that blends at least two photographs to blend into a silhouette of a person
Start to research double exposure online....examples and some links are below but there are so many online....start looking!

Blog Post: Tell me what your ideas are. What do you think might look interesting blended? How can you get the shots or make it work? Their are many examples of nature, but what else can you do?

Assignment 2: Wood Transfers

EQ: What are some creative ways to display your photographs?

These are  hands on projects that you will make before the holidays.


  1. You will create at least one wood transfer and 
  2. one ornament. 
Blog Post: Look at the examples below. I do have some wood that you can use but it is just a simple block. Can you create something that is more exciting? Do you have access to wood at home or could you build something? What type of image can you have? Will you add text or a texture? Can this be a gift for someone? etc. 


Double Exposure Web Examples


Double Exposure Student Example


Links


Wood Transfer Examples


Wednesday, November 16, 2016

Food Photography

You will be staging some set ups and taking images of food for your next project. Please start by researching. Read the following article and watch the videos below. You will be required to take these at home. 

5 Tips for Beautiful Food Photography


Check out some of these top food blogs for inspiration for your own photos!

FOOD BLOGS


Videos 


Styling to the Camera

Assignment criteria to follow


Tuesday, November 15, 2016

Low Key Photography

Check out this link: The Complete Beginner's Guide to Shooting Low Key


EQ: How do I need to set up my light and subject to shoot a low key photograph?


Camera: Work in Shutter Speed Mode (Tv) to help you adjust your own light for this project


Objectives:
  • Shoot varying subjects in low key lighting
  • start to understand the shutter speed setting on the DSLR camera
Assignment:
  • Shoot at least 30 images and print to a contact sheet
  • Show varying subject matter and lighting (at least two)
  • Post two images to the blog One portrait, and one still life object (Can edit in both Lightroom and or Photoshop) with reflection. Make sure to tell me which program you used
  • Tips: Bring in cool stuff or shoot at home so that you have creative imagery and pay attention to clothing, accessories, etc. 


Thursday, November 10, 2016

Peer Feedback

EU: Critical Response, critiquing your own work and the work of your peers is a Massachusetts Visual art standard


EQ: How can I provide constructive criticism to my peers appropriately and how can I then apply that criticism to analyze my own work?


Assignment: Now that you have analyzed and thought about reflections and where you fall on the rubric I want you to take a look at your work in regard to.....
  1. composition
  2. lighting
  3. editing techniques
  4. creative thought
  5. effort
Steps:
  1. Start a blog post entitled "Critique" 
  2. Look at your work from term 1 
  3. Copy and Paste the questions below to answer in your blog post (remember the reflection work we did yesterday)
  4. Lastly, explore all of the work of your peers in the class. Choose at least 3 to critique. Elaborate on your thoughts. Do not write "This is cool, I like it." Write something thoughtful to help them like "This is a great idea, and I love how made the decision to ____________ because it really draws the viewer's eye. I think that if you pushed the subject over to the left a bit more and left more negative space on the right it would make for a stronger composition."
  • Are your composition choices strong for most of your projects? Explain.
  • Did you use or have good light in most of your projects? Explain. 
  • Did you use your software effectively for each project?
  • Did you approach most of you projects creatively and use original ideas when shooting subjects and subject matter? 
  • Did you leave yourself enough time to accomplish the ideas that you wanted to accomplish? 
If you answered yes to all or most of the questions, now tell me in a short paragraph how you could push yourself to a higher level and let me know what you might like to work on. For example, do you want to explore software more, would you rather focus on the cameras and functions, etc.?


If you answered no to all or most of the questions, now tell me in a short paragraph where your weaknesses are. How can you move forward this term and push yourself to become a stronger photographer? What do you know you need to work on?

Wednesday, November 9, 2016

Reflection Rubric

EU: "Read, Write, and Communicate effectively and clearly" is one of the 21st century learning expectations at BHS


EQ: How can I make my writing stronger and use it to inform my audience of my intentions and learning in Photography


Reflection Rubric: Below is a rubric that has been designed to help make your reflections stronger. As we move into Term 2, my expectation for all students is that all reflections for posted assignments reach a proficient or advanced level.


Reflection
Advanced
Proficient
Developing
Emerging
Grammar usage

Creative approach

Software use/editing

Successes/Struggles

Student thoroughly explains creative idea and approach to assignment. New technical tools and editing choices are explained. Student discusses struggles and successes. Proper grammar usage.
Student mostly explains creative approach, successes/struggles, and technical software choices and tools uses. Proper grammar is used. Reflection could be elaborated upon.
Student has only reflected upon some areas of the assignment. One piece is missing. Grammar could be improved.
Student has not reflected at all or has reflected inappropriately without touching upon software use and choices, struggles/successes, and creative approach. Proper grammar is not addressed.

Assignment:
  1. Read through each example below and decide which stage the reflection is at. Is it developing? Is it Proficient? etc. 
  2. Comment on my blog post and decide where each example falls? Number each decision 1-6 and elaborate on why you think it fits that stage?
  3. Start a blog post entitled "reflections" on your own page
  4. Copy and paste the reflection rubric in to your blog post to refer to
  5. Look at all of your reflections for assignments posted in Term 1 and choose which stage you think that you fall into. Did you hit all of the above points in the rubric when writing about your work? Could your reflections successfully explain to someone not taking the course what you did to get your result?
  6. Through writing, tell me which stage you decided on, why you think you hit this stage citing the 4 criteria, and if you fall lower than advanced (which is most likely the case) tell me how you can get stronger as we move on. 

Reflection Examples:
1.

For this photo I adjusted my levels to get a more vibrant color. I love how the green slowly exits the photo and fades into the pink. The macro ability makes it unable to know what the photo is of. The detailed pedal also adds to the photo.


2.
for this picture i put it in black and white

3.

Glorified

For the aesthetics project, I just only used "levels" in order to edit my photos. This was a very simple and fun project besides trying to find the right photo to use for the original.


4.
this is my explosion book the first thing i had to do was to take the pictures, edit them then make the book , after that i taped the pictures down  and folded it up  and then make book covers for the book .

5.


I struggled in my creativity on this project but eventually after playing around with a few things, I came up with an idea. I first took pictures of newspaper then crumpled the newspaper up as a dancer's tutu. The next idea was crayons and then I melted the crayons to make the colorful streaks of wax that turns the paper into art. After I pushed through my creative block, the project was fun to do.

6.
this is my self portrait and i adjusted the levels 


Tuesday, November 1, 2016

Animals

EU: Lightroom is the new software that is one of the industry standards for professional photographers

EQ: How can I import, develop, and export my edited photo using Lightroom?


Assignment: Use Lightroom to edit 2/3 images of an animal

* I am looking for you to practice Lightroom more for editing. Get outside for better lighting! Don't forget about your backgrounds and composition. Animals move so practice the setting with the "running man" on the camera if necessary! I am also looking for different points of view. Beware of the dog or cat laying on the couch in the house at night (not creative and bad lighting!!!)

Thursday, October 20, 2016

Lightroom Development


EU: Lightroom is the new software that is one of the industry standards for professional photographers


EQ: How can I import, develop, and export my edited photo using Lightroom?

MA: Arts
MA: Grades 9 - 12
Visual Arts


Assignment: Photo editing in Lightroom


Objective:


  • Learn to import and export photos in Lightroom
  • Learn basic development techniques

Steps:


  1. Shoot at least 30 images of a subject/s of your choice (they must be new!!!) to edit, import and develop in Lightroom using the DSLR cameras
  2. Import and edit strongest images
  3. Post top 2 to blog showing both a before and after version
  4. Add Reflection

Tuesday, October 11, 2016

Toy Photography

EU: Toy photography has become more popular and a trend within photography and has become a genre

EQ: How can you show action or an idea using still figures?

Click here for tips on Toy Photography

Click here for Fun Photography Ideas

Assignment: Take at least 30 images of various toys and figurines while trying to make them come to life. Post 2 edited images to the blog

Tips:
  • Make sure they look like they are doing something or about to do something
  • Use Lighting to your advantage and add in extra layers to push the action such as smoke, blur, etc. 


Levitation Photography

EU: Photoshop can be used to create images that play tricks on the eye or alter reality. 
EQ: How does a photographer combine images to alter reality and show someone or something floating or levitating

Assignment: Take at least 30 images of both a subject (person) and backdrops to combine in Photoshop using layer masks and various tools to show levitation. 

Tips:
  • The more creative you are the stronger the final image will be
  • Use added images like textures or other photographs to add interest and develop a mood whether it is haunting in the spirit of Halloween and October or light and airy. 
Advanced Students: All Photography students from intro to year 3 are completing this assignment. As an advanced student I expect the final results to be at an advanced level! Think outside of the box.....try more than one if necessary! Lets push your Photoshop skills. 

Click here for a tutorial on levitation although there are many on youtube to watch!!!


Tuesday, September 20, 2016

Still Life


Unit: Photoshop Basics

EU: Photographers are constantly learning new things whether it be styles or software.

EQ: What are some new tools that I can learn to enhance my photo editing skills?

Assignment Steps:
  1. Using the white still life set up in the art room as your subject, take at least 30 shots at varying angles and viewpoints. Be sure to work up close and from further out. Watch your backgrounds! 
  2. Print a contact sheet and pass in 
  3. 3 Edited images to the blog will be labeled with the titles below and show the use of blur, clone stamp and/or healing brush, blend modes, and color adjustments
    • Black and White
    • Sepia Tone
    • Color Balance
  4. Post all three titled image to the blog under "Still Life" and write a short reflection on your process

Click here Student Example

Friday, September 16, 2016

Alphabet Scavenger Hunt

EU: A photographer captures strong photographs by learning to see things differently. The viewpoint, the light, etc all have an impact on the photos that you take and the ability to see a photo opportunity that you maybe wouldn't recognize before. 

EQ: How can you look at an every day object or scene in a different light?


Assignment: Everyday objects contain shapes that mimic the letters of the alphabet. I want you to capture all 26 letters of the alphabet starting with a class scavenger hunt and finishing up over the weekend. All images should be ready to go by the start of next week for editing and posting to your blog. 

Steps: 
1. Get outside and start taking images of objects that resemble letters. Go in close or crop later!
2. Get as many as you can during class but finish for homework so that you have more photo opportunities. You may not use real letterforms!
3. Print and pass in a contact sheet of 26+ images and label each letter on the CS for me so that I know you have found them all. 
4. Choose 3 words to spell over 4 letters each
5. Design 3 separate Photoshop documents with each letter filling a 4x6 vertical frame (size of document depends on  your words)
6. Drop in each letter and edit to achieve your desired result. Contrast is a must here in order for the letter to stand out! Think light vs. dark. 
7. Save all as JPEG's and upload to blog with a short reflection on the assignment. 

Friday, September 9, 2016

Textures

EU: Textures can be overlayed with your photographs in order to create a unique effect
EQ: What kind of textures can you capture to enhance your photography?


Assignment: Textures are available over the internet but it would great to start your own file that you can pull from when necessary. Your file can showcase an array of different types of textures from grunge, to sand, to fabric, etc. 

Steps: 
  1. Get outside and wander to discover and shoot all sorts of textures 
  2. Use the macro lens if desired to get up close on fabrics and more
  3. Turn in a contact sheet with 60 images (mostly different-not ten of the same thing)
  4. Edit at least 20 of your favorites which show a strong variety
  5. Create a folder named "textures" to store them in 
  6. Create a new contact sheet with your edited 20 and post the contact sheet to the blog
  7. Practice overlaying two of your textures with some old or new photographs (use blend modes and layer masks to hide and show what you want) and post to the blog with a short paragraph reflection on your final results